HOW TO BURN M4A TO AUDIO CD

Every now and then, we need to need to burn our music to an audio cd, whether it’s for a birthday party or car radio. While the popularity of CDs has been waning, without doubt, they still play important roles in our lives. So, if you need the fastest way to burn your M4A files to an audio CD, then finish reading this article.
M4A is a file extension encoded with advanced audio coding (AAC), and used to store music or any other type of audio files. M4A is generally regarded as superior to MP3 even though both file extensions are used to store only. M4A sounds better and the size is smaller than MP3 when encoded at the same bit rate which makes it a superior choice when you want to burn into a CD. The music will sound better, and it will enable you fit in more audio-information.
How to Burn M4A To CD on Windows
For the commercially available CD players, they usually don’t recognize M4A and MP3 files. Therefore, if you want to burn your M4A file into a CD, you will be needing a software to convert it into a CD Audio (CDA) format. Turns out this is the only recognized format by CD players. While multitude of software exists out there, it enables the conversion of your M4A files to an audio CD, the Windows Media Player (a native utility of Windows) offers the best solution. However, the entire process is automated hence, you don’t need to download additional software. All that is required is the M4A files and an empty CD.
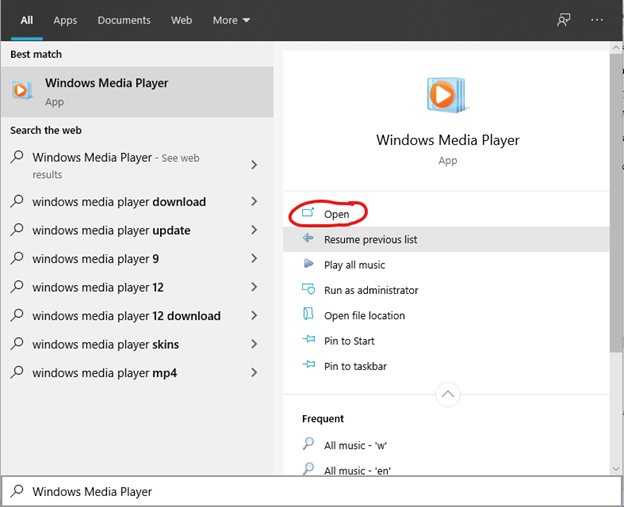
1. Launch the Windows Media Player. On Windows 7, you can find the Windows Media Player icon in the “Start>All Programs” menu. on ‘Windows 8 and 10’, search for “Windows Media Player” and select ‘open’.
2. As soon as the utility loads, click the “Burn” tab at the upper right of the window. This action will open a “Burn record” on your screen. All the M4A files intended to be burned into this window should be dragged accordingly. If there is an empty CD connected to your PC, a meter located at the bottom of your screen will let you know how much space is left for more files.

3. Make sure a blank CD is inserted into your CD drive. If your PC doesn’t have one, an external CD drive will do.
4. Once you have selected the M4A files you’d like to burn into the blank CD, just in the order you want them to appear in the audio CD, select “Start Burn” in Windows Media Player. It is located in the upper part of the “Burn List” window, just below the “Play” tab. This action coverts your M4A files to the universally recognized CDA format and burn the converted audio files to the CD, thereby creating a standard audio CD.

How to Burn M4A to CD on Mac
You can also burn M4A files into audio CDs on mac computers made by apple. This methodology is somewhat similar to those of Windows Media Player as iTunes can be used in burning the audio files to CD. In order to burn M4A to CD, simply follow the following steps:

1. Open the iTunes app.

2. Inside iTunes, you should create a brand-new playlist by selecting “File > New > Playlist” or clicking the + button in the bottom left part of your screen. Afterwards, name your playlist.

3. After naming your playlist, select the M4A files you want to burn and drag them from the iTunes library into the playlist you created and arrange them as you want them to appear in the audio CD.
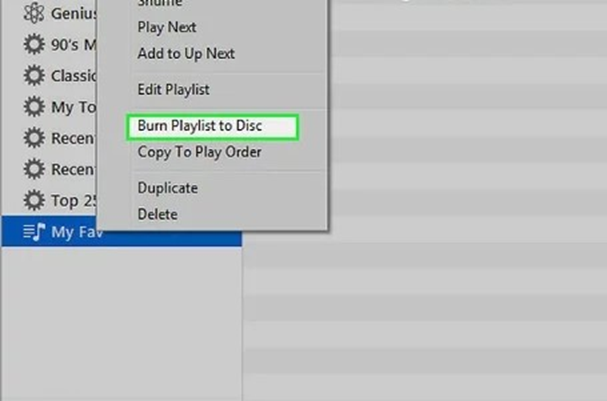
4. Insert a writable CD and the “Burn” option in the bottom part of your Mac. If your iTunes doesn’t have this option, then select “File > Burn Playlist to Disc”.
5. Afterwards, select your preferred settings and select “Burn” and wait for the burning to finish. When the M4A files have been burned, eject the CD and slide into your CD player to enjoy your music.
How to Burn M4A to CD on Linux
Most people that use the open source Linux are professionals. However, that doesn’t stop ordinary people from running world’s most widely used OS. Therefore, whether you run Ubuntu, Debian, Red Hat or Fedora, below is how to burn your M4A audio files into CD.
Burn Using GUI

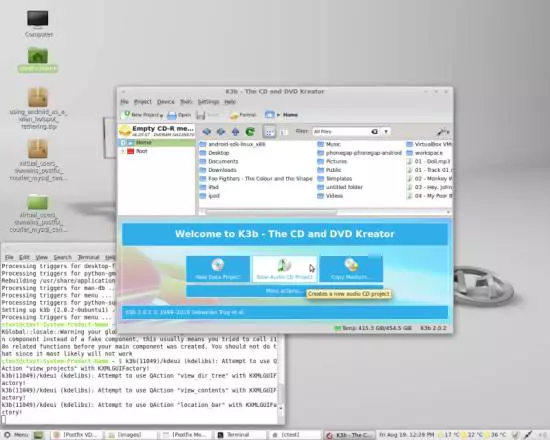
While there are several methods and applications to convert and burn into CD on Linux, using K3B is the only option, especially if you require a Graphic UI (user interface).
· For K3B installation, the following command should run: sudo apt-get install K3B
· Thereafter, input your password and enter K3B to run it.
· choose new audio CD Project in the main window of K3B.
· look through the M4A files then select all. After right-clicking, select ‘add to project’. Your chosen files will be amongst the listed in the panel below. Thereafter, select ‘burn’. For our uses, the choices in the subsequent window should be totally correct. Be sure to select the blank CD as the medium to write on then, go ahead to burn.

· Choose default settings peradventure you haven’t made any yet. Thereafter, the burning process will commence.

· When the process has ended, the disk will automatically be ejected.
· To exit the set-up, click on ‘close’. Feel free to get rid of the unsaved settings that you are informed about when leaving K3B. You can enjoy your newly copied audio disk in any CD prayer of choice
Burning via Linux Command
· Installation of all the needful:
# apt-get install cdrecord ffmpeg normalize-audio libavcodec52
· Store all the M4A files intended to burn in a distinct directory:
01. Bad_Guy.m4a 06 — New York Soul (Part II).m4a 03-Forever Young.m4a Eminem — Rap God.m4a
· If there is a space within the names of your files, put to use the command ‘_’ to replace the space.
$ for f in *; do mv “$f” `echo $f | tr ‘ ‘ ‘_’`; done
Utilize M4As volume via a standardize-audio command. Standardize usually works on wav files. That means you have to convert the M4A file to WAV
$ for i in $( ls ); do ffmpeg -i $i $i.wav; done
· Normalize engaging this command
$ normalize-audio -m *.wav
· After the file has been normalized, identify the CD/DVD burner block device file name using:
$ wodim -devices
· It will bring out something like this:
wodim: Overview of accessible drives (1 found) : — — — — — — — — — — — — — — — — — — — — — — — — — — — — — — — — — — — — — 0 dev=’/dev/scd0' rwrw — : ‘TSSTcorp’ ‘CD/DVDW SH-S183L’ — — — — — — — — — — — — — — — — — — — — — — — — — — — — — — — — — — — — -
· Take note of the file path of block device that is, /dev/scd0'. Then burn all the converted .wav file using cdrecord by using this line:
$ cdrecord -v -nofix -eject dev=’/dev/scd0' -audio -pad *.wav
· Your audio CD is prepared for your CD player.
Take note, the nofix cdrecord’s selection will instruct a cdrecord not to exit a CD disk session and that permits us to include additional tracks on the disk if necessary. If you choose to exit a CD session feel free to do it with the consecutive Linux command: $ cdrecord -v -fix -eject dev=’/dev/scd0'
Conclusion
There you have it, the most proven methods of burning M4A into Audio CD on Windows, Mac, as well as Linux without any unnecessary frills or paying for pricey softwares which normally cost from $20n- $60. Why pay when you can have a better one for free?